How To Access Your Pi Remotely: Control Your Projects From Anywhere
Imagine being able to manage your Raspberry Pi projects from anywhere, whether you are across the room or across the globe. Getting to your Pi without needing a monitor, keyboard, or mouse hooked right up to it truly changes things. It gives you so much freedom, allowing you to tinker, update, or check on your creations no matter where you happen to be.
This ability to access pi remotely is a pretty big deal for anyone who uses these little computers. It means you can set up your Pi in a hard-to-reach spot, like inside a weather station or a smart home device, and still have full command over it. You could be on your laptop at a coffee shop, or just relaxing on your couch, and still make changes or see what your Pi is doing. It’s about making your projects more flexible, you know, and just easier to handle.
In this article, we will go through various ways to access pi remotely. We will cover popular methods like SSH for command-line tasks, VNC for a visual desktop experience, and even some web-based options. We will also talk about how to get to your Pi when you are not on your home network and some important security ideas to keep things safe. So, let's look at how you can get your Pi set up for remote connections, making your tech life a little bit simpler, actually.
- Emily Compagno Children
- Desmond Doss The Unyielding Spirit Of A Conscientious Objector
- Horses Mating
- Eliza Leaks
- Leaked Scarswonderland
Table of Contents
- Why Bother with Remote Access?
- Getting Your Pi Ready
- Method 1: SSH – The Command Line Friend
- Method 2: VNC – For a Visual Experience
- Method 3: Web-Based Interfaces – For Easy Control
- Method 4: VPN – For Secure Network Access
- Accessing Your Pi from Outside Your Home Network
- Security Tips for Remote Access
- Troubleshooting Common Issues
- Frequently Asked Questions (FAQs)
- Taking Control from Anywhere
Why Bother with Remote Access?
The biggest reason to learn how to access pi remotely is simply convenience. You do not have to unplug your Pi and move it to a desk with a monitor every time you need to make a change. This is especially helpful if your Pi is running as a server, perhaps managing a smart home setup, or collecting data somewhere out of the way. It means less fuss, and you can keep your projects running without interruption, which is pretty nice.
Another really good point is that it opens up possibilities for projects that need to be in certain spots. Think about a camera monitoring your garden, or a sensor gathering information in your attic. You would not want to climb up there with a screen and keyboard every time. Remote access lets you manage these devices from your main computer, so you know, it makes those kinds of setups much more practical.
Also, if you have multiple Raspberry Pis, remote access helps you manage them all from one spot. Instead of connecting to each one individually with physical gear, you can just open a few windows on your main computer and control them all. This saves a lot of time and effort, and it’s arguably a smarter way to handle a collection of devices, too it's almost.
- Thanos Actor Age Squid Game
- 1st Studio Siberian Mouse
- Sotwe T%C3%BCrkk
- Christopher Walken Net Worth
- Many Summers Later Gravity Falls
Getting Your Pi Ready
Before you can truly access pi remotely, your Raspberry Pi needs a little preparation. This usually involves making sure certain features are turned on and knowing how to find your Pi on your network. These first steps are pretty straightforward, but they are absolutely necessary for any remote connection method you might pick later on, you know.
Enable SSH
SSH, or Secure Shell, is a common way to get command-line access to your Pi. It is often the first thing people set up for remote control. For newer versions of Raspberry Pi OS, SSH might be turned off by default for security reasons. You can turn it on in a few different ways.
If you have a monitor connected to your Pi right now, you can use the graphical interface. Go to the Raspberry Pi Configuration tool, then the "Interfaces" tab, and make sure SSH is set to "Enabled." This is usually the quickest way if you are physically with your Pi.
Alternatively, if your Pi is running headless (without a monitor), you can enable SSH by putting a file named `ssh` (with no file extension) onto the boot partition of your SD card. Just place this empty file there, and when your Pi starts up, it will turn on SSH for you. This is a neat trick for initial setup, honestly.
Find Your Pi's IP Address
To connect to your Pi, you will need its IP address on your local network. This is like its street address for other devices in your home. There are a few ways to find this, actually.
If you are on your Pi with a monitor, open a terminal window and type `hostname -I`. This command will show you the IP address. It is usually a series of numbers separated by dots, like `192.168.1.100`.
Another way is to check your router's administration page. Most routers have a section that lists all the connected devices and their IP addresses. You will need to log into your router (usually by typing its IP address, like `192.168.1.1` or `192.168.0.1`, into a web browser) and look for a "connected devices" or "DHCP clients" list. Your Pi will show up there, probably by a name like "raspberrypi" or something similar. This is often how people find it when they are setting things up, as a matter of fact.
Method 1: SSH – The Command Line Friend
SSH is arguably the most fundamental way to access pi remotely. It gives you a text-based command line interface, just like you were sitting right in front of your Pi. This method is light on resources and very secure, making it a favorite for many users who just need to run commands or manage files. It is where a lot of people start their remote journey, you know.
Connecting from Windows
On Windows, you have a few good options for connecting via SSH. Modern versions of Windows 10 and 11 have an OpenSSH client built right in. You can simply open the Command Prompt or PowerShell and type your SSH command. This is pretty convenient, so.
The command looks like this: `ssh pi@your_pi_ip_address`. Replace `your_pi_ip_address` with the actual IP address you found earlier. The `pi` part is the default username for Raspberry Pi OS. When you connect for the first time, it might ask you to confirm the connection, and then it will ask for your password. The default password is `raspberry`, but you really should change that right away for security. We will talk more about security later, honestly.
For older Windows versions or if you prefer a different tool, PuTTY is a very popular free SSH client. You just download it, open it up, type in your Pi's IP address, and click "Open." It works pretty much the same way, asking for your username and password. It is a solid choice, and many people still use it, you know.
Connecting from macOS and Linux
If you are using macOS or a Linux distribution, you already have an SSH client built into your system. You do not need to install anything extra, which is pretty handy. You just open your terminal application.
The command is exactly the same as for Windows: `ssh pi@your_pi_ip_address`. Again, replace the placeholder with your Pi's actual IP address. It will prompt you for your password. This direct access makes things really simple for these operating systems, so it's almost a native experience.
Once you are connected, you will see the Pi's command line prompt. You can now type commands just as if you were sitting at the Pi. You can update software, check system status, run Python scripts, and stuff. It is a very powerful way to interact with your Pi, basically.
Method 2: VNC – For a Visual Experience
While SSH is great for command-line tasks, sometimes you want to see your Pi's desktop environment. Maybe you need to open a web browser on the Pi, or use a graphical application. This is where VNC (Virtual Network Computing) comes in. It lets you see and control your Pi's graphical desktop from your computer, which is really cool, actually.
Installing VNC Server on Your Pi
First, you need to install a VNC server on your Raspberry Pi. The most common one is RealVNC Connect. It is often included with Raspberry Pi OS, but you might need to enable it.
To enable VNC, just like SSH, you can go to the Raspberry Pi Configuration tool under the "Interfaces" tab and turn on VNC. If you are doing this headless, you can SSH into your Pi first, then run `sudo raspi-config`. In the configuration menu, go to "Interface Options" and then "VNC" to enable it. This is a pretty straightforward process.
After enabling VNC, the server should start automatically. You might see a small VNC icon appear in your Pi's desktop panel if you have a screen connected. This means it is running, so you know, you are ready for the next step.
Connecting with VNC Viewer
On your computer, you will need a VNC client, often called a VNC viewer. RealVNC offers a free VNC Viewer application for Windows, macOS, Linux, and even mobile devices. You can download it from their website.
Once you have the VNC Viewer installed, open it up. You will typically see a spot to enter the IP address of your Raspberry Pi. Type in your Pi's IP address, and then click to connect. It will ask for your Pi's username (usually `pi`) and password (the same one you use for SSH). After you put those in, you should see your Pi's desktop appear in a window on your computer. It is honestly like magic, seeing your Pi's screen pop up like that.
You can then use your mouse and keyboard to control the Pi's desktop just as if you were sitting in front of it. This is incredibly useful for graphical tasks, browsing the web on your Pi, or using applications that do not have command-line versions. It really gives you full control, so you can do pretty much anything you would do locally, just remotely.
Method 3: Web-Based Interfaces – For Easy Control
For some tasks, a full desktop or command line might be more than you need. Web-based interfaces offer a simpler way to control specific functions of your Pi through a web browser. This can be super convenient, especially for managing servers or specific applications. They are designed to be user-friendly, so you know, often with nice buttons and clear information.
One popular example is Pi-hole, which blocks ads on your network. Once installed on your Pi, you access its control panel by typing your Pi's IP address into a web browser, followed by `/admin` (e.g., `http://your_pi_ip_address/admin`). This gives you a neat dashboard to see statistics and change settings without needing SSH or VNC.
Another option is Node-RED, a visual programming tool. It also has a web-based interface that you access through your browser. These types of interfaces are great because they are accessible from almost any device with a web browser, making them very versatile for certain kinds of projects. They essentially turn your Pi into a web server for its own control panel, which is pretty clever, you know.
There are many other web-based tools and services you can run on your Pi, each with its own way of being accessed through a browser. They are often lighter than a full desktop environment and can be really good for dedicated tasks. You just need to make sure you know the correct address to type into your browser once the service is running on your Pi.
Method 4: VPN – For Secure Network Access
Using a VPN (Virtual Private Network) is a very secure way to access your Pi, especially when you are outside your home network. A VPN creates a secure, encrypted tunnel between your device and your home network. Once connected to your home VPN, your device acts as if it is physically on your home network, so you can access your Pi using its local IP address, just like you were at home.
Setting up a VPN server on your Raspberry Pi can seem a bit involved, but it offers a lot of security and convenience. Popular VPN server software for the Pi includes OpenVPN or WireGuard. These programs let your Pi act as the central point for your VPN. This means all your remote connections go through this secure tunnel.
Once your Pi is running as a VPN server, you install the corresponding VPN client software on your laptop, phone, or other device. When you want to access your Pi, you just connect to your home VPN first. After that, you can use SSH or VNC to connect to your Pi using its local IP address, just as if you were sitting at home. This is honestly one of the safest methods for external access, providing a good layer of privacy and security for all your network traffic, too it's almost.
Accessing Your Pi from Outside Your Home Network
The methods we have talked about so far mostly work when your computer and your Pi are on the same local network, like your home Wi-Fi. But what if you are at a friend's house, or at work, and want to access pi remotely? This needs a few extra steps to make sure your Pi is reachable from the wider internet. This part can be a bit more tricky, but it is definitely doable, you know.
Port Forwarding: A Quick Look
Port forwarding is a way to tell your router to send specific types of incoming internet traffic to your Raspberry Pi. For example, if you want to SSH into your Pi from outside your home, you would tell your router to send incoming SSH requests (which typically use port 22) to your Pi's local IP address. This is a common method, but it does have some security considerations, so you know, you have to be careful.
To set this up, you usually need to log into your home router's administration page. Look for a section called "Port Forwarding," "NAT," or "Virtual Servers." You will create a new rule that specifies the external port (e.g., 22 for SSH, or a different, non-standard port for better security), the internal port (usually the same as the external, but can be different), and your Pi's internal IP address. You also need to pick the protocol, usually TCP. This essentially creates a direct path from the internet to your Pi for that specific service. It is a bit like putting a sign on your front door telling the mail carrier exactly which room to deliver a specific package to, basically.
A big thing to remember with port forwarding is that your home internet IP address might change sometimes (dynamic IP). For consistent external access, you might need a Dynamic DNS (DDNS) service. DDNS services give you a fixed hostname (like `myhomepi.ddns.net`) that always points to your current home IP address, even if it changes. This makes it much easier to connect without having to look up your home IP address all the time.
VPN for External Access
As mentioned earlier, setting up a VPN server on your Pi is a great way to access it from outside your home network. It is generally more secure than port forwarding individual services because it encrypts all traffic and makes your remote device part of your home network. You connect to the VPN, and then you can access your Pi using its local IP address, just like you were at home. This is a much safer approach for general remote access, so you know, it is often preferred.
The setup involves installing VPN server software on your Pi, like OpenVPN or WireGuard. Then you configure your router to forward the VPN port to your Pi. On your remote device, you use a VPN client to connect to your home VPN server. Once connected, your remote device is virtually on your home network, giving you seamless access to your Pi and other devices. It is a pretty neat trick for keeping things secure and simple once it is all set up.
Cloud Services and ZeroTier
If port forwarding or setting up your own VPN seems a bit much, there are cloud-based services that can help you access pi remotely without needing to mess with your router settings too much. Services like ZeroTier or ngrok create secure tunnels or virtual
- Exploring The Race Of Steve Perry A Deep Dive Into His Background And Legacy
- Joe Pesci Health A Comprehensive Look At The Iconic Actors Wellbeing
- Exploring Malachi Bartons Relationships The Young Stars Personal Connections
- From Champion To Inspiration Ronnie Coleman Now
- Hannah Wilcox Ricketts

How to Remotely Access a Raspberry Pi From Your PC
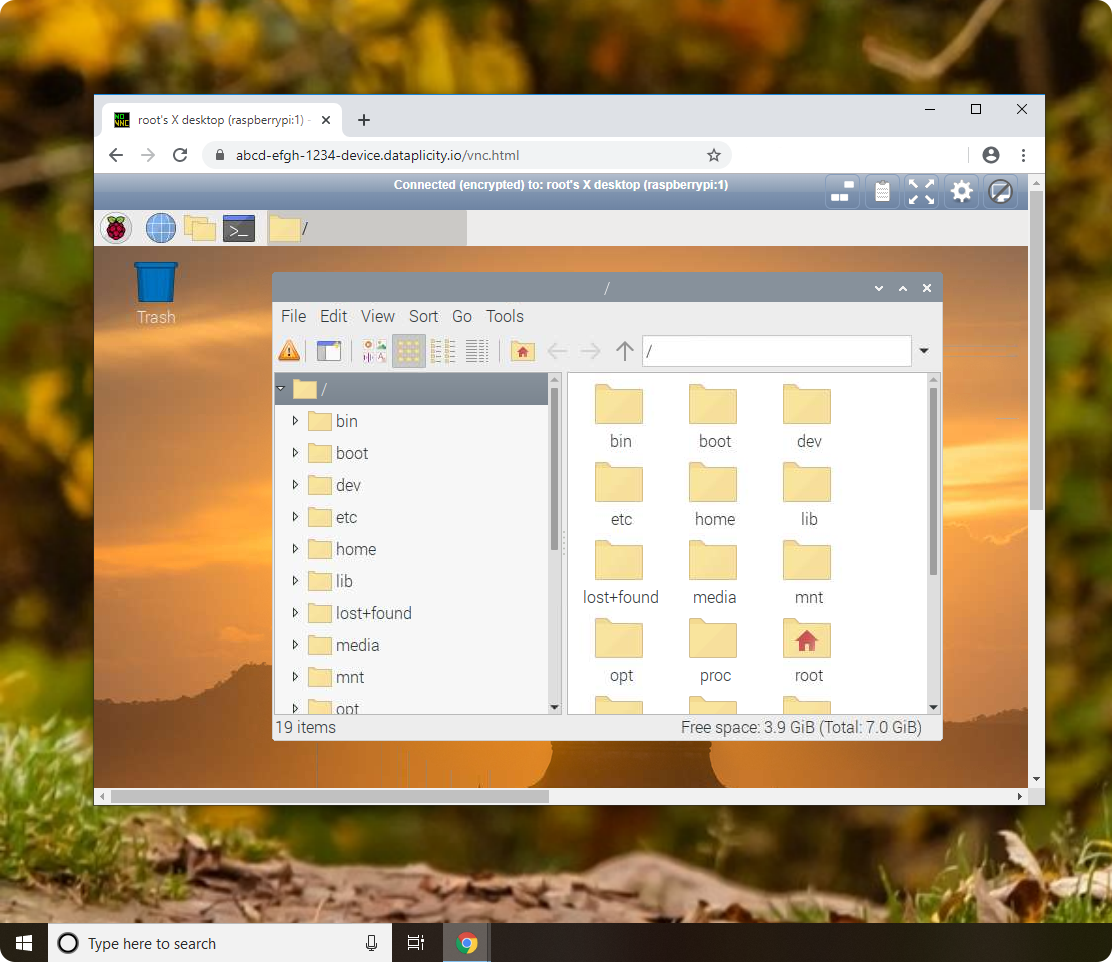
Remotely access Pi desktop
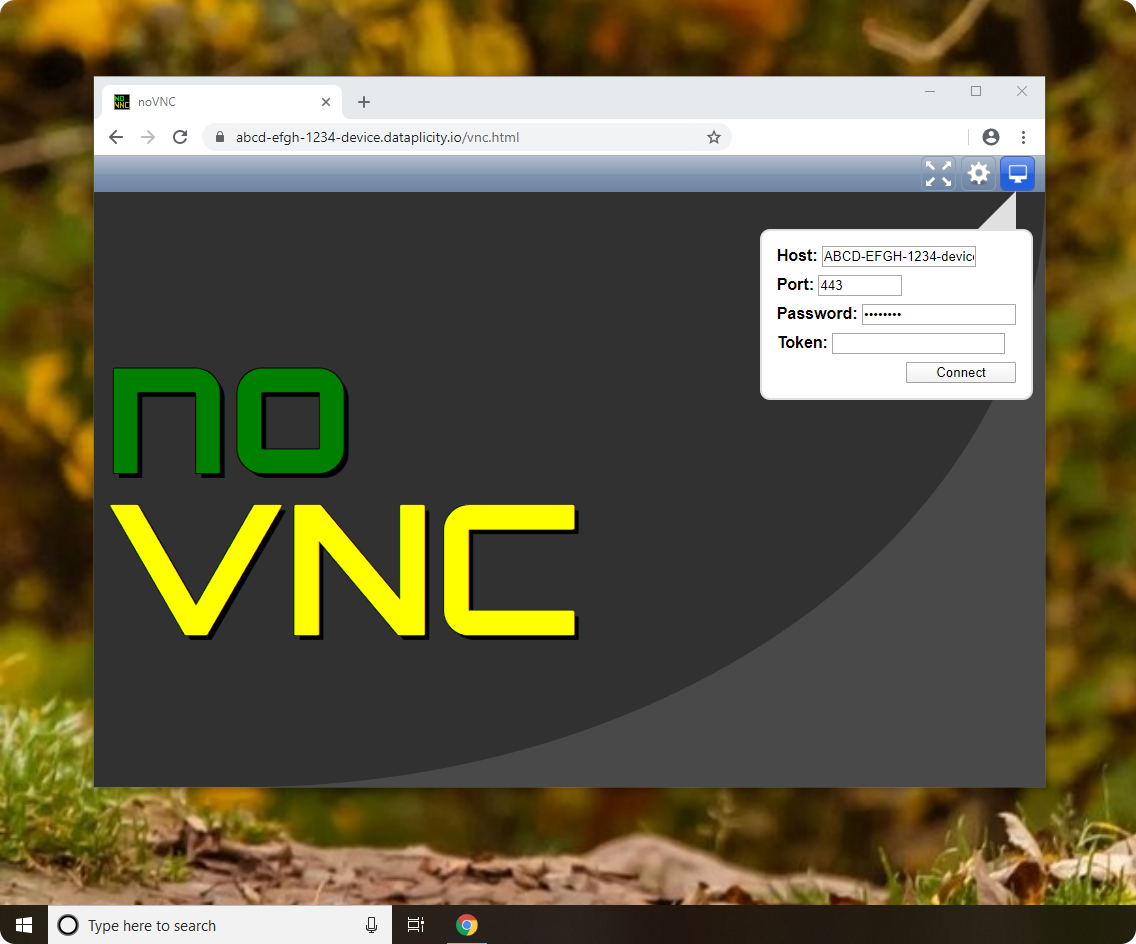
Remotely access Pi desktop
