Free Ways To Remotely Manage Your Raspberry Pi Anywhere
Have you ever thought about controlling your Raspberry Pi without being right next to it? It's a pretty neat idea, isn't it? For many of us, our little Raspberry Pi devices are tucked away, perhaps running a home server, managing smart devices, or maybe even helping with some automation project. But what happens when you need to check on it, tweak a setting, or start a new program while you are not at home? That's where learning to remotely manage your Raspberry Pi free of charge really comes into its own. It offers a kind of freedom, much like finding a remote job that lets you work from anywhere.
The thought of being able to fix things or start something new on your Pi, even when you are miles away, is quite appealing. It means your projects are always accessible, no matter where you are. This flexibility is a big deal, and it's something many people look for in their professional lives too, like those who browse thousands of remote job listings to work at startups and leading companies. You can manage your Pi just like you might manage your work schedule, choosing your own hours, in a way.
So, if you are keen to make your Raspberry Pi even more useful and accessible, stick around. We are going to look at some really effective ways to control your Pi from a distance, all without spending a penny. This means you can keep your projects running smoothly, check on things whenever you like, and feel good about being in charge of your tech, even from afar. It's truly about getting the most out of your small but mighty computer, you know.
- Asianbunnyx Leaks
- Leaked Scarswonderland
- Bomb Threat At Atlanta Airport Today
- Does Lol Superman Exist
- Snow Bunny Girl Meaning
Table of Contents
- The Appeal of Remote Pi Management
- Understanding Your Options for Free Remote Access
- General Tips for Secure Remote Management
- Frequently Asked Questions About Remote Pi Management
- Making the Most of Your Remote Pi
The Appeal of Remote Pi Management
Having a Raspberry Pi that you can control from anywhere is incredibly handy, so. Think about it: you could be at work, on vacation, or just in another room, and still have full command over your Pi projects. This kind of access is not just for tech experts; it is for anyone who wants more flexibility with their devices. It is a bit like the flexibility offered by remote jobs, where you can work from home over the USA, giving you more freedom in your daily life. You can work on your own schedule, which is a very appealing thought for many, is that not so?
- Bonnie Blue 1000 People Video
- Selena Quintanilla Outfits A Timeless Fashion Legacy
- Thanos Actor Age Squid Game
- Aishah Sofey New Leaked
- Emily Compagno Children
Whether your Pi is serving up files, running a smart home hub, or even just acting as a tiny web server, being able to access it remotely means fewer trips to physically connect a keyboard and screen. This saves time and effort, and it just makes everything smoother. It helps you keep your projects running without a hitch, and it gives you peace of mind, too it's almost.
The ability to manage your Pi from a distance also opens up a whole new world of possibilities for projects. You can set up environmental sensors in your garden and check the data from your phone, or perhaps manage a media server for your family while you are away. The meaning of remotely is to a remote extent, and that extent truly expands your capabilities with your Raspberry Pi, allowing you to use it in ways you might not have considered before. It's quite empowering, really.
Understanding Your Options for Free Remote Access
When it comes to controlling your Raspberry Pi from afar without spending any money, you have a few really good options. Each method has its own strengths, so you can pick the one that best fits what you need to do. Some are great for simple commands, while others let you see your Pi's desktop as if you were sitting right in front of it. We will explore the most popular and reliable free methods, so you know what is available to you, basically.
Knowing these methods will give you the confidence to set up your Pi for remote access. It is not as complicated as it might sound, and with a little guidance, you will be managing your Pi like a pro in no time. This kind of skill is quite valuable, much like the advanced job search for we work remotely, allowing you to search and refine jobs across programming, marketing, customer service, and more. It is about having the right tools for the job, you know.
SSH: The Command-Line Friend
What SSH Is All About
SSH, which stands for Secure Shell, is a very common way to connect to your Raspberry Pi remotely. It lets you use a command-line interface, which means you type commands directly into a terminal window on your computer, and those commands are run on your Pi. It is secure because it encrypts the connection, keeping your data safe from prying eyes. This is a pretty fundamental tool for anyone working with Linux-based systems, honestly.
It is fantastic for quick tasks, like updating software, checking system status, or running scripts. If you are comfortable with typing commands, SSH will likely be your go-to method. It uses very little network bandwidth, too, which is a nice bonus if your internet connection is a bit slow. It is, in some respects, the backbone of remote management for many devices, you know.
Getting SSH Ready on Your Pi
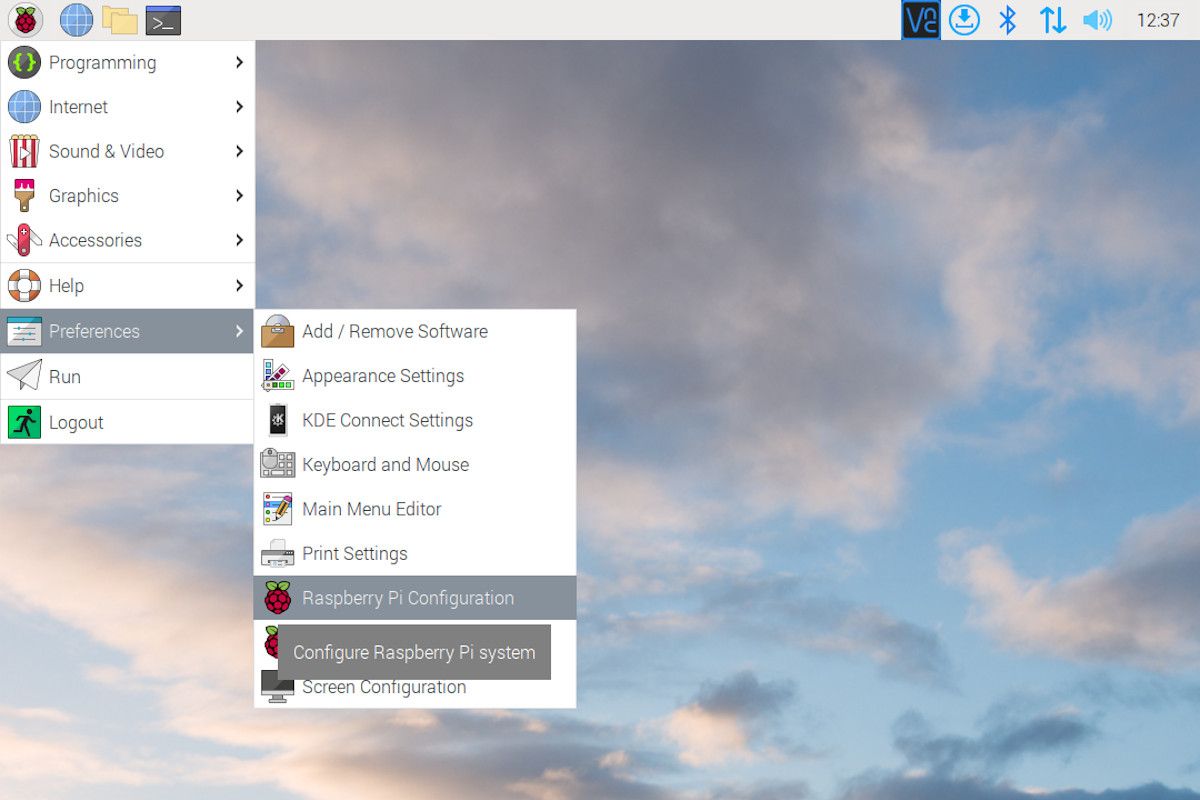
Before you can use SSH, you need to make sure it is enabled on your Raspberry Pi. If you are using a recent version of Raspberry Pi OS, you can do this easily through the Raspberry Pi Configuration tool under the "Interfaces" tab. Just tick the box next to SSH, and you are pretty much good to go. If you prefer the command line, you can type `sudo raspi-config`, navigate to "Interface Options," and then enable SSH there. It is a straightforward process, typically.
For a headless setup (no screen connected), you can enable SSH by creating an empty file named `ssh` (no file extension) in the boot directory of your Pi's SD card before you even boot it up. This tells the Pi to enable SSH on its first startup. It is a very handy trick for initial setup, especially if you do not have a monitor readily available, as a matter of fact.
Connecting with SSH From Another Computer
Once SSH is enabled on your Pi, you will need its IP address. You can find this by typing `hostname -I` into your Pi's terminal if you have a screen, or by checking your router's connected devices list. Then, from your computer, open a terminal (on Linux or macOS) or use a program like PuTTY (on Windows). You will type something like `ssh pi@YOUR_PI_IP_ADDRESS` and press Enter. The default username is `pi`. You will then be asked for your Pi's password. Once you enter it, you are connected! You can then type commands just as if you were sitting right in front of your Pi. It is quite simple, really, once you get the hang of it.
For instance, if your Pi's IP address is 192.168.1.100, you would type `ssh pi@192.168.1.100`. The first time you connect, your computer might ask you to confirm the Pi's fingerprint; just type `yes` and press Enter. After that, it should connect smoothly every time. It is a very direct way to interact with your device, you know.
SSH Security Tips
While SSH is secure, there are things you can do to make it even safer. First, change the default password (`raspberry`) on your Pi to something strong and unique. This is a pretty basic but incredibly important step. Second, consider setting up SSH key authentication instead of using passwords. This involves generating a pair of keys – one public, one private – and it is generally considered more secure than passwords. You put the public key on your Pi and keep the private key on your connecting computer. This way, only your computer with the correct private key can connect, which is quite robust, in a way.
Also, you might want to change the default SSH port (which is 22) to a different, less common port number. This helps reduce automated attacks that typically target the default port. While it does not make your system impenetrable, it does make it less of an obvious target for automated scanning tools. It is a good practice for general security, you know.
VNC: For a Visual Touch
What VNC Does
If you prefer a graphical interface over a command line, VNC (Virtual Network Computing) is probably what you are looking for. VNC lets you see your Raspberry Pi's desktop environment right on your computer screen, as if you had a monitor, keyboard, and mouse directly connected to it. This is super helpful for tasks that are easier to do with a visual interface, like browsing the web on your Pi, opening applications, or dragging and dropping files. It is a very intuitive way to work remotely, especially for those who are not as comfortable with text commands, basically.
It is like having your Pi's desktop projected onto your own screen, letting you interact with it visually. This can be really useful for setting up new software that has a graphical installer, or just for getting a quick visual check on what your Pi is doing. It offers a different kind of control than SSH, providing a more familiar computer experience, you know.
Setting Up VNC Server on Your Pi
To use VNC, you need to install a VNC server on your Raspberry Pi. RealVNC Connect is a popular choice, and a free version is often pre-installed or easily available for personal use on Raspberry Pi OS. You can enable it through the Raspberry Pi Configuration tool, just like SSH. Go to "Interfaces" and enable VNC. If it is not installed, you can get it with `sudo apt update` and then `sudo apt install realvnc-vnc-server`. After installing, you will usually need to set a password for VNC connections. This password is separate from your Pi's login password. It is a pretty straightforward setup process, honestly.
Once enabled, the VNC server will run in the background, waiting for a connection. You can usually find the VNC icon in your Pi's taskbar if you have a desktop environment running, which can give you more options for configuring it. It is important to remember this password, as it is what you will use to gain access from your other device, you know.
Accessing Your Pi with VNC Viewer
On your computer or smartphone, you will need a VNC viewer application. RealVNC offers a free VNC Viewer for various platforms, which works seamlessly with their server software on the Pi. Just download and install it. Open the VNC Viewer, enter your Pi's IP address (the same one you used for SSH), and then you will be prompted for the VNC password you set earlier. Once you enter it, your Pi's desktop should appear on your screen, ready for you to interact with. It is quite magical, really, seeing your Pi's desktop appear as if by magic.
You can then use your mouse and keyboard to control the Pi just as if you were sitting right there. This is especially useful for tasks that are visual in nature, like opening a web browser on the Pi or using a specific application that has a graphical interface. It gives you a full desktop experience, which is very handy for certain projects, you know.
VNC Security Notes
Just like with SSH, security is important for VNC. Always use a strong, unique password for your VNC connection. It is also a good idea to only allow VNC connections over a secure network, such as within your home network, or by first establishing a VPN connection to your home network. Exposing VNC directly to the internet without proper security measures can be risky, as it could allow unauthorized access to your Pi's desktop. So, it is something to be mindful of, really.
Some VNC solutions offer encryption, which adds another layer of security. Always check if your chosen VNC server and viewer support encrypted connections and make sure that feature is enabled. Keeping your Pi's operating system updated is also a general good practice for security, helping to patch any known vulnerabilities. It is a bit like keeping your house locked; you want to make sure all the windows are closed, too.
VPN: A Private Network Tunnel
How a VPN Helps
A VPN, or Virtual Private Network, creates a secure, encrypted connection over a public network, like the internet. When you connect to your home network via a VPN, it is as if your remote device is physically connected to your home network. This means you can access your Raspberry Pi using its local IP address, just as if you were at home. It is a very secure way to access not just your Pi, but any device on your home network, so.
Setting up your Raspberry Pi as a VPN server is a popular choice for those who want a high level of security and access to their entire home network. It provides a private tunnel, ensuring that all your data traveling between your remote device and your home network is encrypted. This is especially useful if you are connecting from public Wi-Fi networks, offering a lot of peace of mind, you know.
Setting Up a Free VPN Server on Your Pi
There are free, open-source VPN server software options you can install on your Raspberry Pi, like OpenVPN or WireGuard. Pi-hole, a popular network-wide ad blocker, also has a version called PiVPN which makes setting up a VPN server on your Pi incredibly simple. It automates much of the configuration process, making it accessible even for those who are not networking experts. You install it with a simple command, and it walks you through the steps. It is a bit more involved than just enabling SSH or VNC, but the benefits in terms of security and network access are significant, honestly.
The process usually involves running a script that installs the VPN software, generates the necessary configuration files, and sets up user accounts. You will then get a configuration file or QR code that you use on your client device (your laptop or phone) to connect to the VPN. It is a very powerful way to manage your network access, you know.
Connecting to Your Pi Via VPN
Once your Pi is running as a VPN server, you will need a VPN client on the device you are using to connect from. Most operating systems have built-in VPN client support, or you can download the official client for OpenVPN or WireGuard. You import the configuration file generated by your Pi's VPN server into your client software. Once connected to the VPN, your remote device will act as if it is on your home network. This means you can then use SSH or VNC to connect to your Raspberry Pi using its local IP address, just as you would if you were at home. It is a very secure two-step process, in a way.
This method essentially makes your home network available to you securely from anywhere in the world. It is a top-tier solution for remote access, especially if you have multiple devices on your home network you want to reach, not just your Pi. It offers a lot of flexibility and security, which is pretty great, you know.
Third-Party Tools for Easy Access
What These Tools Offer
Some services offer cloud-based solutions for remotely managing your Raspberry Pi. These tools often simplify the process by handling the tricky network configuration, like port forwarding, for you. They usually involve installing a client application on your Pi that connects to their cloud service, and then you access your Pi through their web interface or dedicated app. Many of these services offer a free tier that is perfectly sufficient for personal use and basic remote management. They are designed to be user-friendly, which is a big plus for many, you know.
These tools can be particularly appealing if you find the direct setup of SSH or VPN a bit daunting. They aim to make remote access as simple as possible, often with a few clicks. It is a bit like how Remote.io is a job board for remote workers and people who wish to work from home, simplifying the search for remote careers. These tools simplify remote device management, too.
Popular Free Options
One well-known option is TeamViewer, which offers a free version for personal use. Another is AnyDesk, which also has a free tier. Both allow you to control your Pi's desktop remotely. Dataplicity is another popular service specifically designed for Raspberry Pi, offering a free tier that includes web-based SSH access and a basic web terminal. There are also services like Remote.it, which create secure peer-to-peer connections without port forwarding, and often have free usage limits that are quite generous for personal projects. It is worth exploring these to see which one fits your style best, you know.
Each tool has its own specific features and setup process, but generally, they involve signing up for an account, installing their client on your Pi, and then connecting through their platform. They aim to take the headache out of network configuration, which is a significant benefit for many users, you know.
Considerations for Third-Party Tools
While these tools are convenient, it is important to consider that you are relying on a third-party service. This means your Pi's connection goes through their servers, which might raise privacy concerns for some. Always read their privacy policy and terms of service. Also, the free tiers usually come with limitations, such as the number of devices you can connect, connection duration, or available features. For most personal projects, these limitations are not a problem, but it is good to be aware of them. It is a trade-off between ease of use and full control, essentially.
Despite these points, for many users, the convenience offered by these services outweighs the considerations. They provide a quick and relatively simple way to get your Pi online and accessible from anywhere, especially if you are not comfortable with more technical networking setups. It is a good starting point for many, you know.
General Tips for Secure Remote Management
No matter which method you choose to remotely manage your Raspberry Pi, security should always be a top priority. A remotely accessible device is a potential entry point into your home network if not properly secured. So, a little effort here goes a very long way. It is a bit like finding your next remote career; you want to make sure it is a good fit and safe, too.
First, always change the default password for your Pi. The default `pi` username and `raspberry` password are widely known, making your Pi an easy target for automated attacks. A strong, unique password is your first line of defense. Second, keep your Raspberry Pi OS updated. Regular updates often include security patches that fix vulnerabilities. You can do this by running `sudo apt update` and `sudo apt upgrade` regularly. This helps keep your system robust against new threats, you know.
Third, consider enabling a firewall on your Pi. The `ufw` (Uncomplicated Firewall) tool is easy to set up and allows you to control which incoming and outgoing connections are permitted. For example, you can configure it to only allow SSH connections from specific IP addresses. This adds an extra layer of protection by blocking unwanted traffic. It is a very sensible step for anyone with a remotely accessible device, frankly.
Finally, be careful about exposing your Pi directly to the internet. If you must, ensure you are using strong authentication methods (like SSH keys) and consider changing default ports. A VPN is often the most secure way to access your home network from outside, as it encrypts all traffic and makes your Pi appear as if it is still on your local network. These steps help ensure your Pi remains a helpful tool, not a security risk, you know. Learn more about on our site, and link to this page for more insights.
Frequently Asked Questions About Remote Pi Management
How can I access my Raspberry Pi remotely for free?
You can access your Raspberry Pi remotely for free using several methods. SSH (Secure Shell) lets you use a command line from anywhere. VNC (Virtual Network Computing) provides a graphical desktop interface. You can also set up a free VPN server on your Pi, or use free tiers of third-party services like Dataplicity or TeamViewer for personal use. Each offers a different way to connect, so you can pick what works best for you, you know.
What are the best free tools for remote Pi management?
For command-line access, SSH is definitely the best free tool; it is built-in and very secure. For a graphical desktop, RealVNC Connect (personal use) is a strong contender. If you want a full network tunnel, open-source VPN solutions like OpenVPN or WireGuard (often simplified with PiVPN) are excellent. For simpler setup, free tiers of services like Dataplicity or Remote.it are also very good options. It really depends on your comfort level and what kind of access you need, honestly.
Is it safe to remote access my Raspberry Pi?
Yes, it can be very safe to remotely access your Raspberry Pi, but you must take some precautions. Always change default passwords to strong, unique ones. Keep your Raspberry Pi OS updated to get the latest security patches. Consider using SSH key authentication instead of passwords. Enabling a firewall and using a VPN for external access greatly increases security. Without these steps, it can be risky, so being mindful is key, you know.
Making the Most of Your Remote Pi
Learning to remotely manage your Raspberry Pi for free truly opens up a world of possibilities for your projects. Whether you are tinkering with home automation, running a personal cloud, or just want to check on your Pi's status from your phone, these methods give you the control you need. It is about making your technology work for you, giving you the flexibility of remote work and choosing your own schedule, in a way. You can make your Pi work for you, on your own schedule, which is pretty neat.
So, why not give one of these methods a try? Pick the one that sounds most appealing to you, follow the steps, and experience the freedom of controlling your Raspberry Pi from anywhere. It takes just a few seconds to refine the search for a remote job, and similarly, it takes just a little effort to set up remote access for your Pi. The rewards in terms of convenience and expanded project potential are very much worth it. You will find your Pi becomes an even more powerful and versatile tool in your tech toolkit, you know. For more technical details on SSH, you might want to look at the official Raspberry Pi SSH documentation.
- Discovering The Multitalented Max Minghella An Artistic Journey
- Exploring Malachi Bartons Relationships The Young Stars Personal Connections
- Alex Chino Onlyfans
- Dafina Miftari
- Froot Vtuber Cheating

How to Shut Down a Raspberry Pi Remotely
How to Shut Down a Raspberry Pi Remotely
5 Ways To Manage Your Raspberry Pi Remotely
