Access Pi Remotely Free: Your Guide To Staying Connected
Have you ever wanted to check on your Raspberry Pi, maybe run a command, or even see its desktop, but you were nowhere near it? It's a common thought for many who use these small computers, you know. Perhaps your Pi is tucked away in a closet, running a smart home project, or maybe it is just serving files from a different room. The idea of reaching it without having to physically connect a monitor, keyboard, or mouse is quite appealing, really. This kind of freedom lets you manage your projects from almost anywhere, making your digital life a bit simpler.
The good news is that you absolutely can gain access to your Raspberry Pi from a distance, and what's more, you can do it without spending any money. This means you can keep an eye on your home automation, update your media server, or just tinker with your code, all from your laptop or phone. It’s pretty much about making your tiny computer work for you, wherever you are, which is a big convenience for sure. Being able to access pi remotely free means your projects are always within reach, kind of like having a portable control panel.
This guide will walk you through the various free methods available for remote access, explaining each one in a way that is easy to follow. We will look at how to set things up, how to keep your connection safe, and even touch on some common things that might pop up along the way. So, if you are ready to control your Raspberry Pi from across the room or across the globe, without opening your wallet, then keep reading. We will cover all the essentials, you know, to get you going.
- Net Worth Of Jojo Siwa
- Emily Compagno Children
- Leaked Scarswonderland
- Pawgedcom
- Denzel Washington Training Day
Table of Contents
- Methods for Remote Access
- Setting Up Your Raspberry Pi for Remote Access
- Common Challenges and Solutions
- Frequently Asked Questions
- Final Thoughts on Staying Connected
Methods for Remote Access
There are a few different ways to connect to your Raspberry Pi from a distance, each with its own strengths. Choosing the right method often depends on what you want to do with your Pi once you are connected. Some people just need to type in commands, while others prefer to see the full graphical desktop. We will explore the most popular free options here, you know, to give you a good idea.
SSH: The Command Line Friend
SSH, which stands for Secure Shell, is a way to get a text-based connection to your Raspberry Pi. It is like having a keyboard directly connected to your Pi, but you are typing from another computer. This method is really good for running commands, managing files, and doing system updates, because it uses very little network data. It is a very efficient way to work, especially if your internet connection is not the fastest, you know.
To get started with SSH, you first need to make sure it is turned on on your Raspberry Pi. This is usually done through the Raspberry Pi Configuration tool, which you can find in the Preferences menu on the desktop. Just go to the Interfaces tab and make sure SSH is enabled. After that, you can open a terminal on your computer, or use a tool like PuTTY if you are on Windows. You will need your Pi's IP address and your username and password. The basic command looks something like `ssh pi@your_pi_ip_address`. It's pretty straightforward, honestly.
- Which Country Colonized Iran
- Qatar Airways Iran Flights
- Aishah Sofey Boobs Leak
- Where Is Phoebe Cates Now A Look Into Her Life And Career
- Ralph Macchio Net Worth
Once you are connected, you can type any command you would normally use on your Pi directly into the terminal window. This includes things like updating your software with `sudo apt update` and `sudo apt upgrade`, or moving files around. It is a powerful way to manage your Pi without needing a screen. Many users find this method to be their go-to for quick tasks and system maintenance, you know, because it is so direct.
VNC: Your Graphical Desktop
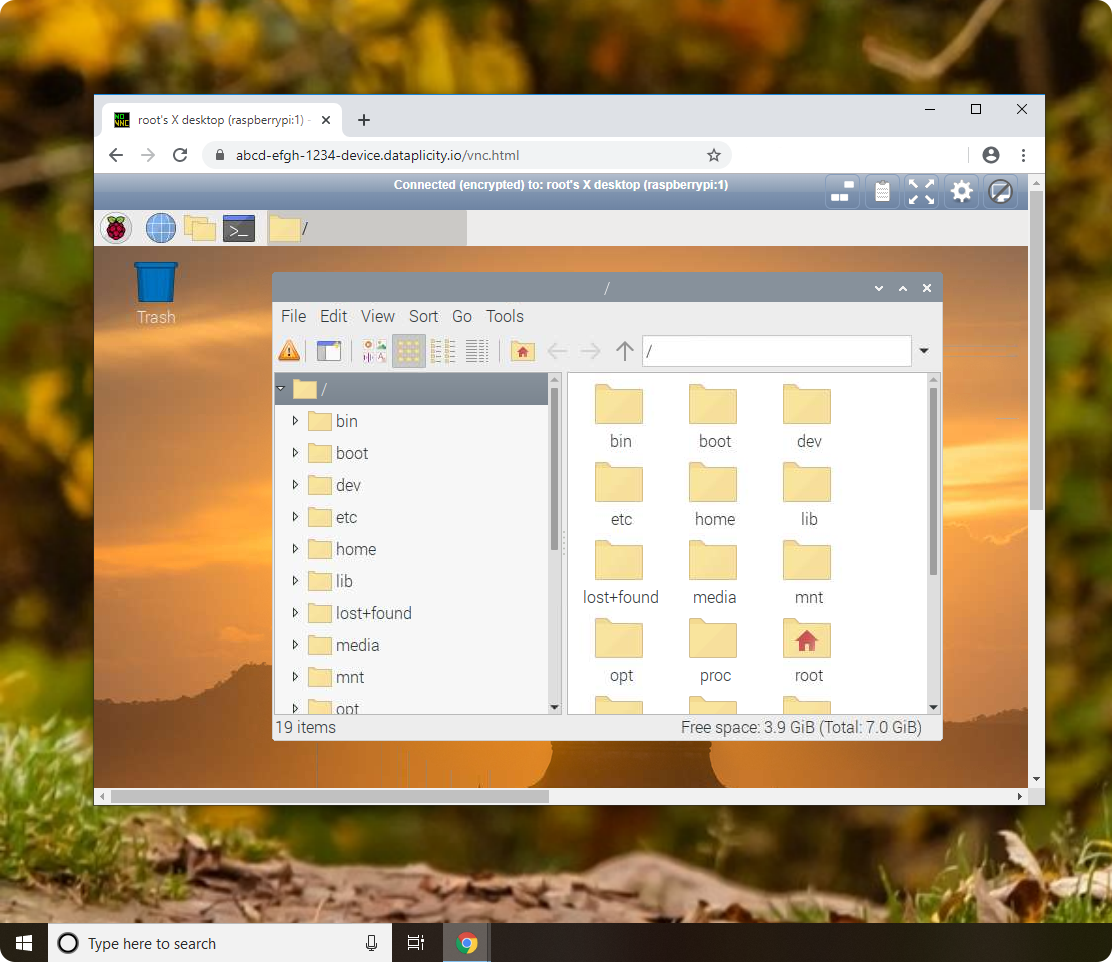
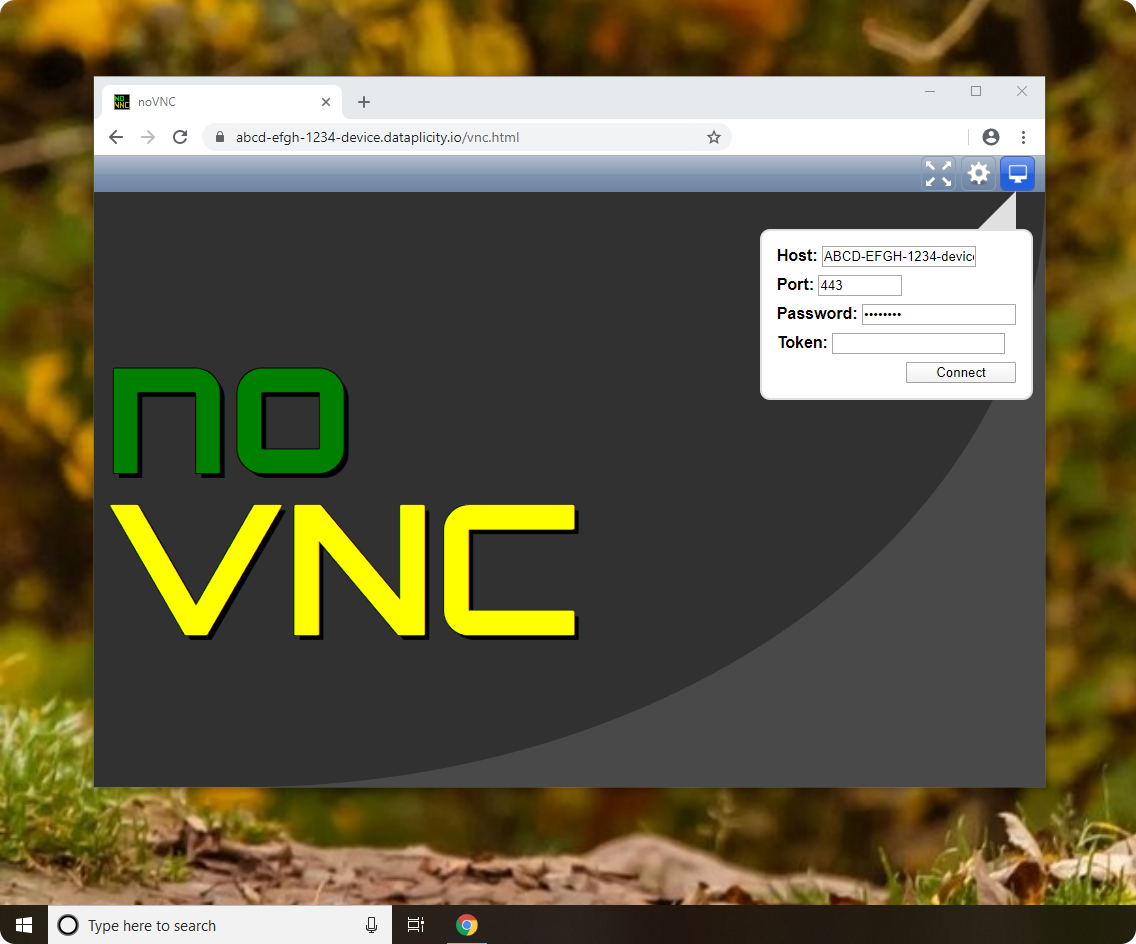
VNC, or Virtual Network Computing, lets you see and control your Raspberry Pi's graphical desktop from another computer. This is a great choice if you prefer a visual interface, maybe to open applications, browse the web on your Pi, or do things that are just easier with a mouse. It is like having your Pi's screen mirrored on your other device. So, if you are working on a project that needs a visual layout, VNC is probably what you want to use, you know.
Setting up VNC involves installing a VNC server on your Raspberry Pi and a VNC client on the computer you are using to connect. The Raspberry Pi OS often comes with RealVNC Connect pre-installed, which makes things a bit easier. You can enable it through the same Raspberry Pi Configuration tool where you enabled SSH. Once the server is running, you will get an IP address and possibly a port number. Then, on your connecting device, you open your VNC client and enter those details. You will be asked for a password, which you set up during the VNC server configuration. It is pretty simple to get going, really.
Using VNC can feel a little slower than SSH, especially if your network connection is not very strong, because it has to send all the visual information. However, for tasks that need a graphical interface, it is invaluable. You can open Chromium, work in Thonny, or just organize your desktop icons, all from a distance. It gives you a full desktop experience, which is quite nice for certain kinds of work, you know, like when you are coding visually.
Other Free Tools and Services
While SSH and VNC are the most common ways to access pi remotely free, there are other tools that offer different ways to connect. These often involve tunneling or using third-party services that simplify the connection process, especially if you are dealing with tricky network setups like firewalls or dynamic IP addresses. It is good to know your options, obviously, because every situation is a little different.
One such tool is Ngrok. Ngrok creates a secure tunnel from your Raspberry Pi to the internet, allowing you to access services running on your Pi without needing to mess with router settings like port forwarding. You run a simple command on your Pi, and Ngrok gives you a public URL that you can use to connect. This is particularly handy for temporary access or when you cannot change your router settings. It is a pretty neat trick, honestly, for getting around network restrictions.
Another option for personal use might be a tool like TeamViewer, which offers a free tier for non-commercial use. While not specifically designed for headless Linux devices like a Pi, you can install a TeamViewer host on your Pi if it is running a desktop environment. This provides a very user-friendly graphical interface for remote control, similar to VNC but often simpler to set up for those less familiar with network configurations. It is a pretty convenient solution for some people, you know, especially if they are already familiar with it.
Setting Up Your Raspberry Pi for Remote Access
Getting your Raspberry Pi ready for remote access involves a few important steps. These steps ensure that your Pi is not only reachable from afar but also that it stays safe from unwanted visitors. It is about preparing the ground, so to speak, for a smooth connection. We will go through the initial setup and some network considerations, you know, to make sure everything works.
Initial Pi Setup
Before you try to connect remotely, make sure your Raspberry Pi is up-to-date. This means running the update commands to get the latest software and security patches. An updated system is a more stable and secure system. Just open a terminal on your Pi and type `sudo apt update` followed by `sudo apt upgrade`. This usually takes a little while, but it is a really important step, you know.
Next, you will want to enable the specific remote access services you plan to use, like SSH or VNC. As mentioned earlier, this is typically done through the Raspberry Pi Configuration tool. Make sure the 'Enabled' radio button is selected for SSH, and for VNC if you plan to use it. If you are using a headless setup (no monitor), you can enable SSH by creating an empty file named `ssh` in the boot partition of your SD card before you first boot the Pi. This is a pretty common trick, actually, for initial setup.
It is also a good idea to change the default password for the 'pi' user, or even create a new user account. The default password is well-known, and keeping it makes your Pi an easy target. A strong, unique password is a basic but very effective security measure. You can change it with the `passwd` command in the terminal. This is a simple step, yet it makes a big difference in keeping your Pi safe, you know.
Network Configuration Tips
For your Raspberry Pi to be accessible from outside your home network, your router needs to know where to send the incoming connection requests. This often involves something called port forwarding. Port forwarding tells your router to direct specific types of incoming network traffic to your Raspberry Pi's local IP address. For example, SSH typically uses port 22, and VNC often uses port 5900. You will need to log into your router's settings, which can be a bit different for each router model, you know.
Another helpful step is to give your Raspberry Pi a static local IP address. By default, your router might assign your Pi a different IP address each time it connects to the network, which can make remote access inconsistent. A static IP means your Pi always has the same address on your home network, making it easier to set up port forwarding and connect reliably. You can usually set this up in your router's DHCP settings, or directly on the Raspberry Pi itself by editing network configuration files. It is a bit of a technical step, but it helps a lot with reliability, honestly.
If your home's public IP address changes often (which is common for many internet service providers), you might consider using a Dynamic DNS (DDNS) service. A DDNS service gives you a fixed hostname, like `myrpi.ddns.net`, that automatically updates to point to your current public IP address. This way, you do not have to keep track of a changing number. Many routers have built-in DDNS client support, or you can run a DDNS client directly on your Pi. It is a clever way to keep things connected, you know, even if your address shifts.
Keeping Things Secure
When you open your Raspberry Pi to the internet, security becomes a really big deal. You want to make sure only you, or people you trust, can get in. There are a few things you can do to keep your Pi safe from unwanted access. It is about building a kind of digital fence around your device, you know, to protect it.
One of the best security measures for SSH is to use key-based authentication instead of passwords. This involves creating a pair of cryptographic keys: a public key that goes on your Raspberry Pi and a private key that stays on your connecting computer. When you try to connect, your computer uses the private key to prove its identity to the Pi. This is much harder to guess or crack than a password. It is a bit more involved to set up initially, but it offers a much higher level of security, honestly.
You might also want to change the default SSH port (which is 22) to a different, less common port number. While this does not stop a determined attacker, it can help reduce the amount of automated scanning and brute-force attacks your Pi faces. Many bots just scan for the default port, so changing it makes you less visible. It is a simple change that can make a difference, you know, in reducing noise.
Consider setting up a firewall on your Raspberry Pi, even a basic one. Tools like `ufw` (Uncomplicated Firewall) make it easier to manage firewall rules. You can configure it to only allow incoming connections on the specific ports you need (like your SSH or VNC port) and block everything else. This adds another layer of protection, making sure only authorized traffic can reach your Pi. It is a good practice for any device connected to the internet, you know, for peace of mind.
Common Challenges and Solutions
Even with careful setup, you might run into a few bumps when trying to access pi remotely free. It is pretty normal for things not to work perfectly on the first try. Knowing what to look for can save you a lot of time and frustration. We will cover some common issues and how to sort them out, you know, to help you get back on track.
A frequent issue is simply not being able to connect at all. This could be because your Raspberry Pi's IP address has changed, especially if you did not set up a static local IP. Check your router's connected devices list to find your Pi's current IP. Another reason could be that your router's port forwarding is not set up correctly, or maybe your internet service provider blocks certain ports. Double-check your router settings and consider using a tool like Ngrok if port forwarding proves too difficult. Sometimes, a simple reboot of both your Pi and your router can clear up minor network glitches, you know, it is worth a try.
If you are connecting from outside your home network and it is not working, it might be an issue with your public IP address. If your ISP assigns a dynamic IP, it changes from time to time. This is where a Dynamic DNS service really helps, as it keeps your hostname pointing to the correct, updated IP. Without it, you would have to find out your new public IP address each time it changes, which is pretty inconvenient, honestly. There are free DDNS services available that are fairly easy to set up.
Sometimes, firewalls can block connections. This could be a firewall on your Raspberry Pi itself, on your router, or even on the network you are trying to connect *from*. If you are connecting from a public Wi-Fi network, for example, their firewall might block outbound SSH or VNC connections. Try connecting from a different network to see if that is the problem. On your Pi, make sure any firewall software you have installed is configured to allow traffic on the ports you are using for remote access. It is all about making sure the path is clear, you know, for your connection to get through.
Frequently Asked Questions
People often have similar questions when they are looking to access pi remotely free. Here are some common ones that come up, with straightforward answers. These address some of the main concerns and curiosities folks have about remote access, you know, to clear things up.
Can I access my Raspberry Pi from anywhere?
Yes, you absolutely can access your Raspberry Pi from almost anywhere with an internet connection. This includes connecting from a coffee shop, a friend's house, or even from another country. The key is setting up your home network correctly, usually with port forwarding and possibly a Dynamic DNS service if your home's public IP address changes often. As long as your Pi is powered on and connected to your home network, and your router is configured to allow the connection, you can reach it. It is pretty amazing, honestly, how much freedom it gives you.
Is it safe to access my Raspberry Pi remotely?
Accessing your Raspberry Pi remotely can be safe, but it really depends on how you set it up. Using strong passwords, enabling key-based authentication for SSH, and changing default port numbers are all important steps. Also, keeping your Raspberry Pi's software updated helps protect against known vulnerabilities. Think of it like locking your front door; you want to make it as difficult as possible for unwanted guests to get in. If you follow good security practices, you can definitely make it safe, you know, for your data and your device.
What do I need to access my Raspberry Pi without a monitor?
To access your Raspberry Pi without a monitor, keyboard, or mouse, you essentially need a way to connect to it over the network. This usually means enabling SSH on the Pi (which can be done by putting an empty file named `ssh` on the boot partition of the SD card before first boot). Then, you will need another computer or smartphone with an SSH client. For graphical access, you would also need a VNC server running on the Pi and a VNC client on your connecting device. A network connection for both devices is obviously a must. It is all about using the network to stand in for the physical connections, you know, making it truly headless.
Final Thoughts on Staying Connected
Being able to access pi remotely free opens up a lot of possibilities for your Raspberry Pi projects. Whether you are managing a home server, tinkering with automation, or just want to check on something, having remote control makes things a lot easier. It means your little computer is always ready for your commands, no matter where you are. The methods we talked about, like SSH and VNC, are reliable and do not cost anything, which is pretty great, you know.
Remember to always keep security in mind when you set up remote access. Using strong passwords and updating your system regularly are simple but very important steps to keep your Pi safe. It is like making sure your digital front door has a good lock. With a little setup, you can enjoy the freedom of controlling your Raspberry Pi from anywhere, anytime. So go ahead, give it a try, and see how much more you can do with your Pi. You can learn more about Raspberry Pi projects on our site, and also check out our guide on network basics for more help. It is a rewarding experience, honestly, to have that kind of control.
- Unistar Two Babies One Fox
- Aishah Sofey Content
- Bonnie Blue 1000 People Video
- Is Cal Raleigh Married
- Unveiling The Charismatic Actor From Mad Men A Journey Through Talent And Fame

How to Remotely Access a Raspberry Pi From Your PC
Remotely access Pi desktop
Remotely access Pi desktop
